

How to Enable Remote Desktop in Windows 10
In an office, the benefit of networking client computers helps centralize all Data resources in one location for easy access using a Remote Desktop App. The app makes it easy to connect a remote PC from your Local office PCs or external office with the use of the internet.
This post will walk you through step-by-step procedures of How to configure an Office Network Workgroup, How to Enable Remote Desktop Connection in Windows 10, and How to Solve Remote Desktop connection Error in Windows
If you want to learn how you can join an office PCs Network Workgroup, enable remote desktops to connect PC and share network resources, and solve remote desktop errors that pop up when connecting to a remote pc, make sure to read this post and get started.
What is Workgroup Network
A workgroup is a peer-to-peer network that allows two or more computers to connect together to share resources. If you want to share files and printers with other PC configure them on the same network.
What Is Remote Desktop Client
Microsoft Remote Desktop client app helps you to control a remote PC locally, with a remote desktop install or enable.
NOTE: You can log in to a remote pc perform a function such as:
– Use apps Installed on remote PC
– Have access to files and network resources on the remote PC
– Leave the apps not closed when discounting the client
How to configure an Office Network Workgroup
Here are steps to follow and Join A computer to Workgroup Network
1. Firstly, set the computer that you are coming to join to the workgroup with the same IP-Address range

2. To Add the PC to Workgroup, Right-Click on This PC, Click on properties, Click on change settings

3. Click on “Change” on Change Settings Window Pop- up

4. Type the Workgroup name example(techped.net)

5. After Click OK and restart to join the Pc to Workgroup

Watch the Video
script async src=”https://pagead2.googlesyndication.com/pagead/js/adsbygoogle.js?client=ca-pub-8030304793874408″
crossorigin=”anonymous”>
How to Enable and Use Remote Desktop for Windows 10
– First and foremost, click “start”, Click all apps then choose remote desktop connection.

Important Note
Connecting to a remote pc, things to consider: Remote desktop Enable, IP-Address, Username and Password.
How to Enable Remote Desktop Connection
1. Right Click This PC icon on the Desktop
2. Click on Properties
3. Click on change settings
4. Then you click on remote

5. When the remote pop-up window pop-up, you click allow remote connection, click on allow then you, select the user that can be able to log on to the remote

Important Note
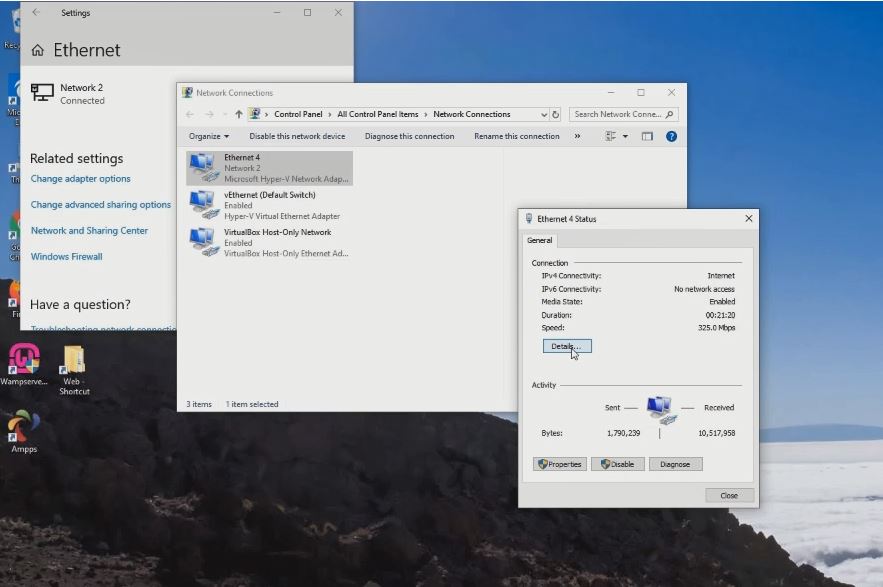
To know the IP address of the remote pc, click on the network on the taskbar, then click on the internet change adapter option right click and click status, click detail
6. To Connect Remote PC, Clicks remote desktop connection app, then you type the IP address of the remote pc that you want to connect it then you type the password the user name then you click connect

Watch the Video:
How to allow remote connections on Windows 10
Firstly, you need to enable a remote desktop connection on the remote pc. Secondly, you need to know the remote pc IP Address, and thirdly, you need to know the username and password of the remote PC.
Hare steps to Follow to allow remote connection on Windows 1. On the remote desktop, you right-click on This PC icon, and on the left side you click properties on “This PC” 2. Click “change settings” on the pop-up that appears Window 3. Click on remote, On the remote desktop, you need to “allow a remote connection to this computer” this will enable you to connect to the remote PC. 4. “Select Users” Add a user name, click on Advanced 5. Click on “Find Now” to “select the user”, and click ok to add 6. Tune in to the “remote desktop connection app” on the local PC, Enter your Username and Password and connect to Remote Computer. watch the Video Most of the time when you try to connect to a remote PC, you’ll get a pop-up that the remote desktop can’t connect to the remote computer for one of these reasons. Note: 1. Click on the “Start Button” and Choose “Remote Desktop Connect Apps” to Open i. Firstly Try Connect To the Remote PC and type User name and Password to Authenticate user right to login to the remote PC. ii. Right Click on Remote Machine PC “properties” vi. After allowing remote connection you need to know the Remote PC IP Address. Watch this Video Conclution More Video I am an information technology professional, who always follows his passion. I love to write about tips and tricks of Windows, Virtual Pc, WordPress, OBs, Windows Security, AWS Amazon, Google Cloud, Local Hosting, and Cloud Hosting.


How to Solve Remote Desktop connection Error in Windows
1. Remote access to the server is not enabled
2. The remote computer is turned off
3. The remote computer is not available on the network
To Solve the Connection Issue, firstly you need to type the right password and also allow remote desktop connection on the Remote PC before you can connect to the remote PC using the remote desktop connection app on windows

Solve Remote Desktop Connection issues

How to Enable Remote Desktop Connection

ii. On change settings click the remote tab in the tab you’ll find you have not allowed remote connection
iii. Click allows remote connection then select users that have the right to log on to the Remote PC.


Now, you must have an idea of How to Enable Remote Desktop in Windows 10, Ask your questions in the comments below. Try to follow us on Facebook, Instagram , and Twitter. Also if the post has helped you Kindly subscribe to our YouTube channel to continue learning.
SarkEddy
![]()
![]()